Pages

Showing posts with label Cleanup. Show all posts

22 July 2013

A Place to Drop Your Things...

Since Frank and I park in the garage everyday, we almost always come into our home through the breezeway.  When we moved in, there was a step up from the breezeway into the Dining Room.  As we talked through our renovation plans, we decided it would be better if there were no step up immediately to enter the home, and if there were some place we could drop our things as we entered.  There's nothing I hate more than a big pile of mail on the kitchen counter, and shoes all over the place. 

Our solution was to create a mini-mudroom with a "sunken" floor.  We chose to tile the floor with the same tile we used in the entry/foyer, and added cubbies for coats, a bench to store and put on shoes, and even a "stuff" tower for mail, phones, bags, etc.  The mudroom entry lets us enter the side but still take off our coats and shoes right away without walking all the way to the front door, etc.  So here's how it's shaping up...

Standing at the end of the kitchen island, looking towards the mudroom/breezeway.

Mail/Stuff Tower.

Mudroom bench seating and coat cubbies.

We'll be adding hooks in the cubbies as well, but those are still in the works.  The mudroom is turning out just as we hoped, and we know it's an area we'll use heavily every day!

Garage Door Decor

While Frank was traveling I decided to keep myself busy with a little DIY project.  Since we moved in, we both disliked the "door decor" on the garage doors.  The design is nice, but really doesn't go with the rest of the house.  The design sort of reminds me of an Egyptian palace, haha. So, here's what the door looked like before...

Garage door with decor - Before
Garage door without decor - After


All 3 doors after!


Now that the garage doors look better, the roof is drawing my eye more and more.  It's in good shape luckily, but the tree debris stains this light color.  When it's time for a new roof we'll be going with something darker to hopefully end that issue. 

As for the garage door decor, there's another DIY project checked off the list! We're thinking about painting these doors to coordinate with the rest of our updates, and then eventually replace them down the road.  More to come on that soon!

14 June 2013

Windowwwwwwws!

The windows are here! AND they're now all installed!! The crew's been installing this week, and since it took me so long to get to writing this post they're now all installed.  We're so excited!  The delivery came at the very end of May.  Frank and I were very busy the last few weekends though, with my half marathon, and traveling up to NJ.  Here's a glance at what the delivery looked like when the windows arrived...


Truck Delivery for the windows and sliding/glass doors!

Stack-o-sliders

Stack-o-windows

Once they all arrived, we had to wait for the window sills to arrive.  Frank and I went with a limestone will, to compliment a few other limestone installations we already had in the house (fireplace, mantle, etc.).  Once those arrived, it was time to install. 

Day 1: The crew installed the two master bathroom windows, and the side breakfast nook/patio door.

Window in mater bathroom from inside.
Side of the house - window in master bathroom from the outside, minus trim at this point.


Exterior view of the new patio/breakfast nook door!
Day 2: The crew moved on to installing the kid's bedroom windows, the breakfast nook back window, and the big front living room window -- that one was a beast!
Kid's bedroom - interior view of windows.
Exterior (front of house) view with two kid's bedroom windows in (far left and middle) and master bathroom window at the far right installed, minus trim.

Breakfast nook area - interior view of patio door and window.

Exterior view - living room "beast" window.

 Day 3: The crew opened up the new window between the kitchen and dining room, installed that new window and installed the dining room window and master bedroom window.
Back of house exterior - you can see where the new window opening is starting to take shape.

Here is the new window all opened up, and the dining room window in the back with the crew.

Interior view from the kitchen - breakfast nook window on the left and new window at the right of this photo.

Interior view from the dining room - new window on the left and dining room window on the right.

Interior view from the breakfast nook - all three windows (new on in the middle).

Day 4: The mancave window went in, as well as the mudroom sliding glass door, and the master bedroom sliding glass door! That's it for getting the windows in place!!
I came home to this! Standing in the breezeway, looking at new slider into mudroom.
Interior view standing in kitchen/living room - mudroom slider and breakfast nook patio door.

Exterior view - master bedroom slider.

View from the back of the house (prior to mancave window install).

So there you have it!  The windows and glass doors are in!  The interior doors arrived this week, along with a few other fixtures.  Things are really moving along here.  Next up, trimming all the windows and moving on to more of the finishing -- installing hardwoods, touch-ups and painting, etc.  Things are looking good for our July finish!

28 February 2013

Ding Dong the Glass Wall's Dead!

The dreaded glass block wall... is finally gone!  We've been dying to rip that wall down since we moved in, and the day has finally come where we can say goodbye!  As you may remember, this is what the wall looked like when we moved in...

View from kitchen looking into our new dining room.

Standing with your back to the brick fireplace wall, looking toward the front hall on your left and kitchen on the right (Gotta love those old padded walls!).

Standing in the Dining Room, looking toward the front door.

Standing at the front door, looking toward the back of the house.
And now here's what it looks like today, sans glass wall! (San flooring in the foyer too!)
Standing in the Dining Room, looking towards the front door/Foyer and staircase.

Standing in the Foyer, looking back towards the Dining Room.
We LOVE how open it feels now, and how much more light there is with that wall down.  We plan to add a 1/2 wall (regular wall) in it's place, so that we can guard the staircase and also leave space to add furniture in the dining room if we want to in the future (i.e. a buffet).  The only thing left to demo in the Dining Room at this point is the carpeting and ultimately the window swap.  That's it for now!

Gray Walls in Their Extreme Form!

The other day I came home from work, parked in the garage, and walked into the breezeway... to this:

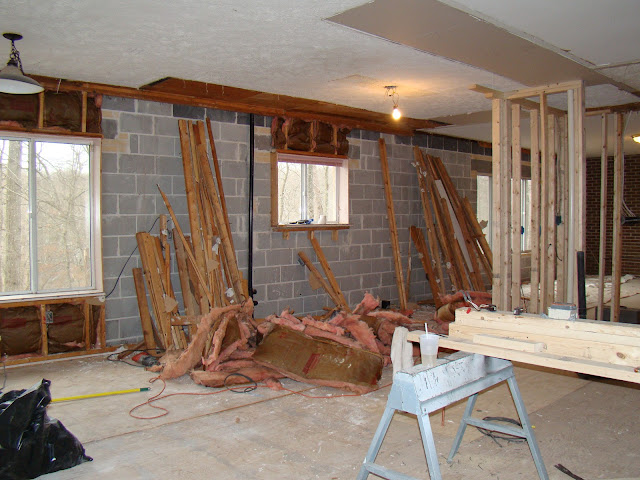
What a mess!  A lot of this was the exterior walls that were demoed from the main level.  This stuff was what we needed to still load up and take to the dump.  We chose to re-frame and re-insulate most of the exterior walls on the main level since we found out that they were not consistent from room to room.  The Dining room had more narrow studs than the kitchen, etc.  This caused the walls to be uneven once we had everything opened up.  Re-framing also gave us an opportunity to re-insulate.  We definitely could use the additional insulation, and ultimately it will make our house more efficient.  So we're happy about that. 

Now, getting to the title of this post... the "Extreme Gray Walls."  Here's a look at what I mean by that phrase...


Who votes to keep the cinder-block look?!?!  Haha... those photos were taken after all of the demo was cleaned up.  But here's a look at what it looked like during that process:


That fiberglass insulation sure is messy!  But we got it all cleaned up and fresh new insulation will be in before we know it. More to come soon...

Our Pantry Grew Some Walls!

In our last post about the main level kitchen/open floor plan it looked like this:


You can barely see that the pantry bottom frame was laid.  Since then, our pantry has started to grow some walls, haha!  Things are definitely coming to life with this space, and it's exciting to be able to walk around it and get a feel for how it will truly be once it's finished. 

Here are a few pictures of the initial exterior pantry walls going up...

View from standing in side mudroom looking straight on towards pantry.

View from standing in living room, towards the front of the house looking back.

Now, the pantry looks more like this:


We've added the stud walls inside the pantry that will support the backs of out cabinetry, as well as house plugs, water lines, etc. that will be needed for the appliances.  We've also finished up the electrical work that will be in, on, and around the pantry (for the most part).  We'll need to update switches and do finishing touches like that when we get more into the "putting things back together" final stages. Another thing we finished up was ripping up the old hardwood and other flooring and prepping the sub floor for new flooring.

So for now, that's where things stand in the kitchen/pantry!

Bar update...

Not much of an update with the bar really, but a few things have happened. 

1. We ripped up the old tile floor - what a mess that was!
2. We demolished the old counter top - also a big mess!
3. We had the new stainless steel back splash installed around the cook-top - YAY!
4. We ordered the new tile & will be order the new counter very soon... so hopefully we'll be back in working order before we know it!

Here are a few pictures of the changes...


We've since taken down those boards holding up the stainless while it set.  I'll save the full view for the mid-way reveal once the flooring and counter top are in!  So for now, you'll just have to wait. :)

Man Cave Update!

The Man Cave is still coming right along... Since the last post, we've insulated the room, and also put up the studs for the wall framing.  Here's a look:


We also have the closets framed up.  So now I can go and plan out the closet organizers! FUN!!


We plan to order new closet doors that will be like french doors - so we'll add those after we drywall.  Speaking of drywall, that's soon on the list.  We need to finish up a few things that go through the man cave ceiling up through the kitchen floor still.  Once those things are done, we'll be able to close the walls up in the man cave!  We are also planning to put a rug in here as flooring.  Still have to pick that out as well. 

More updates to come soon hopefully!

31 January 2013

Walls down!!!

Earlier this week I went to my girlfriend's house for a wine & Bachelor ladies night.  We had a great time and a delicious spread of wine snacks to go with our beverages and trashy TV! I got home around 9pm or so, and was so happy to see all the work that had been accomplished while I was gone... Lots of walls came down!!!! The soffits were taken down in the kitchen, more flooring was taken out and the open floor plan is starting to really come to life! The space looks so open and bright, even at night with those walls down.  It's glorious!  We can't wait to see it come together as we start putting things back together (hopefully soon!!!).

Here are some pictures from a few different angles of the demo party that was had while I was out...

View from the side sliding glass door that we come through from the garage.
View from standing just right of the sliding door, towards the new living room looking towards the back of the house.

View standing left of the slider, at the back of the house looking towards the front door (with all the Christmas cards still hanging on it!).

Same spot, but looking along the back wall towards the new dining room space.

Standing in the new dining room, looking towards the side sliding glass door and future kitchen area.

Looking straight on at the side sliding door from the railing next to our staircase that leads downstairs.


The breezeway has really come in handy during our renovations as well! It's a great place to keep supplies clean and out of the way, but also safe from the outdoor elements.  Here's how the "shop" looked yesterday...


So that's it for now... hopefully they get a lot more done today while I'm at work and school! It's a great feeling to come home to so much progress.  The more they get done the closer we are to that finish line!