Pages

28 February 2013

Ding Dong the Glass Wall's Dead!

The dreaded glass block wall... is finally gone!  We've been dying to rip that wall down since we moved in, and the day has finally come where we can say goodbye!  As you may remember, this is what the wall looked like when we moved in...

View from kitchen looking into our new dining room.

Standing with your back to the brick fireplace wall, looking toward the front hall on your left and kitchen on the right (Gotta love those old padded walls!).

Standing in the Dining Room, looking toward the front door.

Standing at the front door, looking toward the back of the house.
And now here's what it looks like today, sans glass wall! (San flooring in the foyer too!)
Standing in the Dining Room, looking towards the front door/Foyer and staircase.

Standing in the Foyer, looking back towards the Dining Room.
We LOVE how open it feels now, and how much more light there is with that wall down.  We plan to add a 1/2 wall (regular wall) in it's place, so that we can guard the staircase and also leave space to add furniture in the dining room if we want to in the future (i.e. a buffet).  The only thing left to demo in the Dining Room at this point is the carpeting and ultimately the window swap.  That's it for now!

Gray Walls in Their Extreme Form!

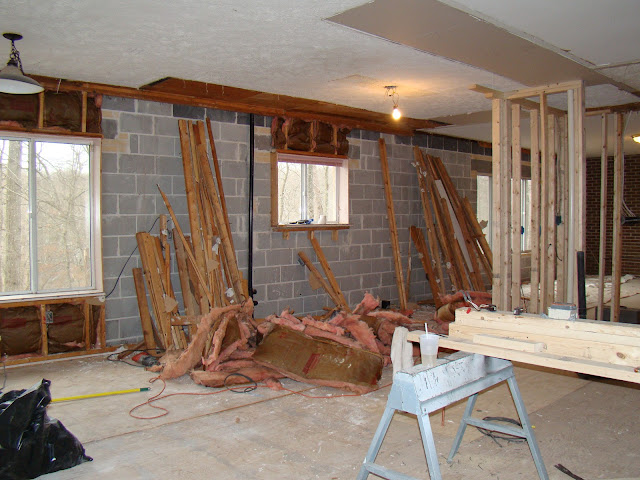
The other day I came home from work, parked in the garage, and walked into the breezeway... to this:

What a mess!  A lot of this was the exterior walls that were demoed from the main level.  This stuff was what we needed to still load up and take to the dump.  We chose to re-frame and re-insulate most of the exterior walls on the main level since we found out that they were not consistent from room to room.  The Dining room had more narrow studs than the kitchen, etc.  This caused the walls to be uneven once we had everything opened up.  Re-framing also gave us an opportunity to re-insulate.  We definitely could use the additional insulation, and ultimately it will make our house more efficient.  So we're happy about that. 

Now, getting to the title of this post... the "Extreme Gray Walls."  Here's a look at what I mean by that phrase...


Who votes to keep the cinder-block look?!?!  Haha... those photos were taken after all of the demo was cleaned up.  But here's a look at what it looked like during that process:


That fiberglass insulation sure is messy!  But we got it all cleaned up and fresh new insulation will be in before we know it. More to come soon...

Our Pantry Grew Some Walls!

In our last post about the main level kitchen/open floor plan it looked like this:


You can barely see that the pantry bottom frame was laid.  Since then, our pantry has started to grow some walls, haha!  Things are definitely coming to life with this space, and it's exciting to be able to walk around it and get a feel for how it will truly be once it's finished. 

Here are a few pictures of the initial exterior pantry walls going up...

View from standing in side mudroom looking straight on towards pantry.

View from standing in living room, towards the front of the house looking back.

Now, the pantry looks more like this:


We've added the stud walls inside the pantry that will support the backs of out cabinetry, as well as house plugs, water lines, etc. that will be needed for the appliances.  We've also finished up the electrical work that will be in, on, and around the pantry (for the most part).  We'll need to update switches and do finishing touches like that when we get more into the "putting things back together" final stages. Another thing we finished up was ripping up the old hardwood and other flooring and prepping the sub floor for new flooring.

So for now, that's where things stand in the kitchen/pantry!

Bar update...

Not much of an update with the bar really, but a few things have happened. 

1. We ripped up the old tile floor - what a mess that was!
2. We demolished the old counter top - also a big mess!
3. We had the new stainless steel back splash installed around the cook-top - YAY!
4. We ordered the new tile & will be order the new counter very soon... so hopefully we'll be back in working order before we know it!

Here are a few pictures of the changes...


We've since taken down those boards holding up the stainless while it set.  I'll save the full view for the mid-way reveal once the flooring and counter top are in!  So for now, you'll just have to wait. :)

Man Cave Update!

The Man Cave is still coming right along... Since the last post, we've insulated the room, and also put up the studs for the wall framing.  Here's a look:


We also have the closets framed up.  So now I can go and plan out the closet organizers! FUN!!


We plan to order new closet doors that will be like french doors - so we'll add those after we drywall.  Speaking of drywall, that's soon on the list.  We need to finish up a few things that go through the man cave ceiling up through the kitchen floor still.  Once those things are done, we'll be able to close the walls up in the man cave!  We are also planning to put a rug in here as flooring.  Still have to pick that out as well. 

More updates to come soon hopefully!

04 February 2013

Now that's what you call an "Open Floor Plan!"


This past week was a great one for renovation progress at the house! One big thing that we were able to accomplish was cutting in the mudroom for our side entry.  The mudroom will be sunken below the rest of the main level by a few inches, and will be a tiled space.  We'll have some cubbies and hooks to hang coats, and places for shoes and mail too.  Since the side door is the main way that Frank and I enter, this will be where we put our things mainly as we enter and leave.  Since the mudroom is sunken, we had to do some work down in the man cave as well -- so framing started down there.  Here are a few pictures of how this all went down...

Mudroom cut-in, view from upper level - living room looking back.
 
Mudroom cut-in, view from lower level/man cave.


Sub-floor put into mudroom sunken floor.

Supports and sub-floor installed (from man cave).
Sub-floor installed, another view from top.
Mapping out where things will go with tape, haha!


That's it for now.. check back again soon!